AScon SSX V12 project
 The AScon SSX V12 project is an ongoing concept build of my own design. Have the background story about the project here.
SSX V12 concept - a think inside the box concept.
A widely used term for creative thinking is "thinking out of the book", but in fact it is more challenging to think inside the box. To set oneself limitations a bit in the same way as Danish filmmakers created the concept of dogme95 through the setup of 10 dogmas for filmmaking:
- The recordings must be made on location, scenery and props must be present from the start and must not be placed on site for the recordings.
- The sound must never be produced separately from the recordings. Music is only allowed if it is played directly during the recordings, e.g. in the form of a tape or disc that runs while the scene is being shot.
- The camera must be handheld.
- The film must be in color. Special lighting is prohibited, but if there is too little light for the shots, you can put a single lamp on the camera.
- Filters are prohibited.
- The film must not contain superficial action, e.g. murder and weapons are prohibited.
- In terms of time and geography, the film must not deviate from reality. The film has to happen here and now.
- Genre films are prohibited.
- The film format must be Academy 35mm film.
- The instructor must not be credited.
My interest in cars may be lifelong. Anyway, at least I bought a car even before I had my drivers license. When I was 17, I bought a used Volvo 544 from 1961. I had not told my parents about the purchase, and when it was delivered in the courtyard, there was a knock on my bedroom door. It was my father who wanted to know what it was that had been handed over in the courtyard. I replied I had bought a car that I would repair for my own use when I now would have my driving license in half a year's time. My father, who was a blacksmith, got a quite angry and saw a great risk that it would be him who would have to repair the car, so he asked me to deliver it back to the dealer again, which I refused, as I myself had earned the money for it. That argument was good enough for him, and already the next day I had the car over the grease pit in my father's workshop.
When I inspected the car from below, I could see a pair of impatient legs walking around the workshop, and suddenly it sounded, "What does it look like?" I replied that it looked OK for me to see, but that he was then welcome to take a look at the car himself, and soon he was standing in the grease pit, noticing that it looked better than he had imagined, and that I could then ask him for advice during my restoration work. He was a good father - even that day.
In the period from 1984 to 1996, my car interest was focused on four-wheel drive vehicles. First I restored a Land Rover 88 ”from 1961 and later 3 Willys Jeep CJ3b, which was my favorite model. It was not until 1996 that my interest in sports cars arose, as a close friend and Morgan enthusiast was looking for a Morgan 4 + 4, as he and his wife wanted to go on a trip with their two small children. We sat in their kitchen looking at ads in an issue of "Classic & Sportscars" and I kept focusing on pictures of Jaguar XKers. I dropped a comment: "If I ever have to have a sports car, it has to be a Jaguar XK140DHC." My friend answered briefly; "Have you seen the prices?"
Nevertheless, all this interest in Jaguars resulted in me buying an Jaguar XK140DHC in 1996 after intensive correspondence with Steve's British Connection in Illinois USA. Steve was completely honest about the car, and he put it in his own way: "It's a rough project, Anton, but you will never have a cheaper Jaguar XK140DHC."
It was restored and in 2000 it was registered on Danish number plates. I had great pleasure from the Jaguar, and I had it for 18 years before I sold it to a buyer in Austria in 2018.
My fascination with Jagauar cars and Jaguar XK models in particular had two reasons. The beautiful design, and Jaguar's amazing image built especially on Le Mans, and in 2002 I decided to go to Le Mans and watch "24 Heur du Mans." Since then I have been down there 4 more times, and Danish Tom Kristensen made the experience for a Dane so much the greater. Le Mans created a huge fascination by both LMP and GT cars for me. Especially the closed LMP cars like the Lola Aston Martin and Bentley models, and by the GT cars it was the Panoz, Corvette, Ferrari, TVR and Aston Martin that fascinated me. Around 2006 the idea arose in my slightly sick head that I could build a car in the LMP style. I did not have the money to make a real race car like these, but maybe I could build something that looked like them, and then it came there with the dogmas into the picture. I set out the following 5 dogmas:
- Closed LMP look
- Materials: Chassis and body Aluminum
- Center motor
- Drivetrain: Jaguar XJS V12
- Recycling: Most possible parts from donor car Jaguar XJS - e.g. front bridge, rear reabridge, gearbox, engine, steering, etc.
After all, the decision to do the experiment had in principle already been taken as I formed these 5 dogmas, so I started the project.
My very first sketches were hand-drawn sketches, and later I downloaded my first 3D drawing program Google SketchUp, and started learning the principles of the program, I quickly realized that the easiest way to create a 3D sketch was to draw the cross section of the car for every 10 centimeters and set these frames up in order, thereby creating an image of the car. But I got increasingly better at using the program, so I also tried to make 3D drawings of the front- and rear bridge and the engine in SketchUp. It went well, and now I could see how e.g. the engine would be positioned relative to the driver 's seat, the rear bridge and the differential.
It turned out that the car on my first sketches would be too short, if I myself should be in it too, which is not insignificant in order to be able to drive it. After some fiddling around, I made things fit. The large automatic transmission will then go directly into the differential. Hopefully I will be able to line it up completely straight, but time will tell. In any case, the engine, gearbox and rear bridge are fixed in the same chassis. The driver's seat also comes quite far forward, so to keep the body shape as close to the desired one as possible I had to place the windshield quite close to the driver, and then let the side windows continue past the front of the engine compartment. My legs will be located on the original front bridge just between the front wheels where the engine on the XJS would normally lie. The driving position will be half lying, but I think it will be fine and above all a completely different feeling to drive a car with that driver position in the car.
Now I imported a cheap XJS from California. When it arrived it was fully functional and I test drove it over a weekend using a couple of test registration numbers, so I found that it runs fine. Now I could also measure and draw a chassis frame according to exact measurements from the Donor car which by the way was totally rust free.
The chassis frame itself followed the same lines as the ones on the XJS, which ensured that the front- and rear bridge got the same mounting points on my project car. The mounting points on an XJS front bridge consists of two large bolts through the chassis frame at the front and two smaller bolts at the rear. The rear bridge is mounted in four points with 8 bolts through the chassis frame. The advantage of the XJS construction is that everything is assembled on the front and rear bridges. Wishbones, suspension and power steering all sits on the front bridge and in the same way the rear suspension accommodates wheel suspension, disc brakes close to the differential and drive shafts are all mounted in one unit. As mentioned, the engine is mounted in two rubber blocks on the front bridge and a spring bearing at the rear. That whole device is also being recycled on my project.
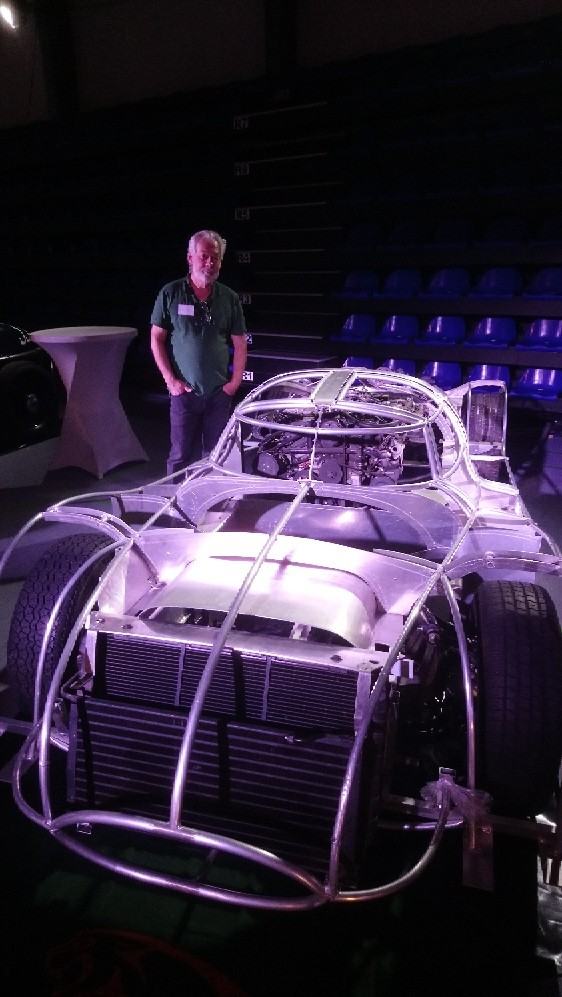
Eventually I got so far that I could start building the chassis. The main chassis was designed as box profiles with a transverse box construction to support the engine. I basically had no budget, so I picked up some veneer sheets from the bulders merchant and started cutting out templates, and subsequently with a jigsaw I cut sheet metal parts out to the box profiles. It is surprisingly easy to cut even 4mm aluminum sheets with a jigsaw. Since then, I have built a tube chassis on top of the main chassis frame. The tube chassis now makes up the contours of the final car quite precisely.
I managed to disassemble, the engine, front- and rear bridge from the XJS and mount these on the project just as I try placed the engine. Then, as previously mentioned, I sold the XK in 2018, and since I can not live the rest of my life without a Jaguar, I decided that my donor car should be reassembled and registered for my own use in Denmark. Now I have brought home a 1992 XJS, as a new donor car for the project. That's actually where I'm right now - assembling an XJS. Hopefully I will get the project back on track before UHS2021, but it will in any case.
Tools needed.
So the tools I used were a jigsaw, a new Migatronic TIG welder, a plate bender, a pipe bender and some shaped wooden blocks to bend aluminum pipes in.
At an early stage, I acquired an English wheel from Justin Baker in Kettering, a hand-operated bead roller from a Danish vendor.
A few days ago I received from a good friend two tree stumps, which now need to be formed so that I can use them to beat some body panels. The only tool I need now is a stretcher / shrinker, which I need to get hold on before the body work is getting started seriously.